Last Thursday, the vet came out to geld our 2016 colt, Up. He was about 13 months old, and I actually had it scheduled earlier, the same day the vet was doing all the spring dentals, but it turned out to be a very snowy day … not a good day to to lay a colt down on the ground! So we postponed, and this time were much luckier with a beautiful sunny warm day.
I was in charge of holding him up on his back, which mostly involved propping his chest between my feet, so I was in an ideal vantage point to document the whole procedure. So fair warning – this post contains photos of the actual surgery, so if you’re squeamish, you may want to click away!
First of all, the vet gave him a thorough check over. It wouldn’t be advisable to anesthetize a horse who wasn’t in good health, so checking his heart, lungs and temperature was step one. Next she counted the testicles to be sure they were both present and accounted for – something I’d already checked prior to booking the appointment, but not a step you want to miss! If one or both of his testicles was undescended, we would have been looking at a much more significant procedure, that would’ve needed to be done in clinic instead of on the grass in my backyard. Luckily for Up (and my bank account) he had two properly descended (and really quite large for his age) testicles.
Once all the preparations have been made, the vet begins by sedating the colt, then once they are “sleepy” they administer the drug that puts them to sleep for the procedure. The vet carefully helps the colt lay down so they do so without injuring themselves (or a bystander for that matter).
We rolled Up onto his back, braced between my feet, and I held his forefeet in my hands to steady him.
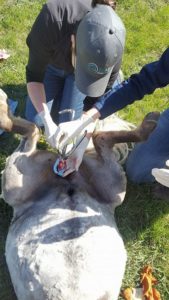
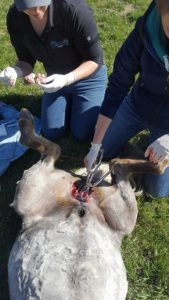
Once the vet got started, the first thing she did was scrub the area to reduce the chance of introducing infection. Then the testicles were injected with a local anesthetic, and the area was scrubbed again before the vet and the student who was assisting her donned sterile gloves for the actual surgery.
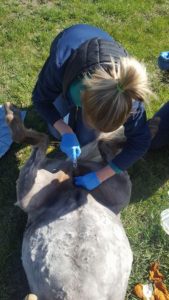
Because of a Miniature Horse’s small size, my vet prefers to tie off the blood vessels with suture prior to removing the testicle with the emasculators, due to concerns the crushing action of the tool might not be effective enough for the miniature sized vessels involved. It’s an added insurance against bleeding post surgery – the vessels supplying the testicles of a horse are significant and a bleed could be life threatening, so better safe than sorry.
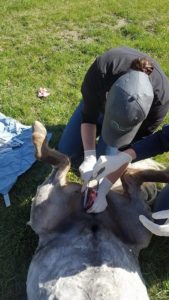
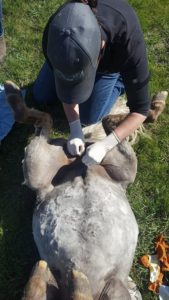
Once the cord was tied off, the vet used the emasculators to crush the vessels just above the suture, and then cut the vessels and attachments to remove the testicle. The emasculators stay in place for two minutes, to ensure the blood vessels are crushed and allow clotting to take place.
Then the whole procedure is repeated on the second testicle.
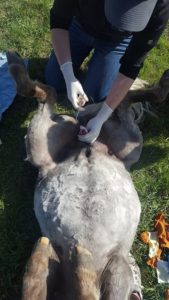
The incisions are left open to allow for drainage, and all that’s left is to wait for the horse to wake up – Up seemed a little too close to waking up after the first testicle was removed, and they gave him a top up of the anesthetic drug, so he had a lovely sleep on the grass for a while before he was ready to wake up. Once he did, he stood up with no trouble at all – the advantage of a Miniature Horse is that if he’d been wobbly still, it would’ve been quite easy to help him stay on his feet, something that can be quite a bit more dramatic with a full sized horse! He also had a shot of anti-inflammatory, and his spring vaccinations to make sure his tetanus status was up to date.
For the first day, the vet recommended keeping him in a stall to make sure everything was well clotted and to make it easy to monitor for any complications. After that, exercise is the name of the game! Exercise will help keep the incisions open and draining, and most importantly reduce swelling. They don’t really start to swell for a few days, and that’s when you really have to make sure they’re exercising, or they just stand around and feel sorry for themselves, and get more and more swollen, which means they aren’t draining, which sets them up for an infection.


Kendra;
Hi,i just finished reading your article about casterating your 13 month old mini horse gelding and i also enjoyed looking at the pictures of the casterating procedure that your vet did on your newly gelded mini horse up.
Have you ever had to spay one of your mini horse mares?
I used to board my llamas on a farm in bc canada and one of the farmer owner had a horse mare that was spayed and i have never heard about horse mares being spayed before while i was boarding my llamas on the farm in mission bc.
Have a nice day tomorrow kendra.
Kim
Hi Kim,
I’ve never spayed one of my mares, no, but I did see the procedure a couple times when I worked for the vet clinic. It’s a much more invasive surgery than a castration, so isn’t done routinely, usually only if there is a health concern.
Kendra