In combined driving Miniature Horses compete in the Very Small Equine (VSE) division, which is open to horses (or ponies or donkeys or mules) 39” and under at the withers. Horses do not need to be registered, and you can compete with a single, pair, tandem or four-in-hand. You also enter for your level: Training, Preliminary or Intermediate. You choose what level you enter, and you can stay at Training level until you’re comfortable moving on.
There are three phases to each Combined Driving competition, whether a full three day Combined Driving Event (CDE) or a one day Driving Trial.
Dressage
Driven dressage is a series of compulsory figures performed from memory.
Before anyone says, “But I’ll never remember!”, you can find all the tests on the American Driving Society webpage, and the test you’ll be asked to perform for your level will be listed in the prizelist, so you’ll have lots of time to practice at home. Also, at Training level, you are allowed to have someone call your test, so that you won’t get lost. And if you DO get lost? The judge will blow his whistle, you drive over to them, and they will help you out and tell you where they’d like you to restart from. You’ll get some extra penalty points, but it’s not the end of the world. You can get lost three times before you’re eliminated, and even then you still get to play in the rest of the phases.
For the VSE (Very Small Equine) division, the dressage ring will generally be either 30 meters by 60 meters, or 20 meters by 40 meters, and the size will also be listed in the prizelist, so you’ll know what size circles you need to be practicing.
When you print off the dressage test, it will also show you exactly what they’re looking for when they judge each movement. Depending on the show, there are anywhere from 1 to 3 judges, and you’ll get a completed score sheet from each of them. This is a valuable learning tool! Not only is each and every movement scored out of ten, but you’ll also get notes on what the judge liked in each movement and what they think you need to work on.
In most of the smaller shows, Presentation is judged “on the move” during your dressage test, but at bigger shows you report for Presentation judging shortly before your dressage test. There is a ton of information out there on presentation and turnout, but here are the basics. Everything (horse, cart, harness and human!) needs to be very clean, well fitted and tidy. You should have brown reins, at least the portion that you hold on to, as well as brown gloves. You must wear an apron/lap rope and a suitable hat or helmet – check the rules for the event, in our area you must now wear a helmet at all phases. You should wear a jacket or blazer, and nothing too sparkly. In general, the guideline is that you should dress as though you were going to work in a bank. Maybe more accurate would be in a bank 50 years ago? Think a bit conservative.
You are required to carry a spares kit at all times and it will be checked at Presentation and during any Safety checks. You’ll find a complete list of required and recommended spares in the prize list or rule book, but the basic required spares for a single are: a halter and lead, a leather punch, a spare trace or trace splice and a spare rein or rein splice.
You’re given a start time for your dressage test, and you need to give yourself time to warm up, report for presentation judging or a safety check (as required) and be at the ring ready to go at your appointed time. One of the bonus’ of this kind of driving is that you’re never waiting around for your class! The judge will blow the whistle, and you have 60 seconds to enter the ring and begin your test. Often a competitor decides to use this time to make a loop around the outside of the ring in order to let his horse have a look at the fence.
Marathon
This is the fun part! Well, it’s all fun, but the marathon is when you get to go on a nice long drive with your horse!
At larger shows, the Marathon consists of 3 sections. Section A, which is distance over cross country, the transition, which is a walk only section, and Section B, which is where you find the Marathon Obstacles or Hazards. At most of the driving trails you’ll find they only do Section B, so we’ll just worry about that one.
The distance of a Section B Marathon varies depending on your level of competition, but generally it’s from 3 to 10km and includes between 3 and 6 Obstacles/Hazards. (Marathon Obstacles used to be called Hazards, but were changed because “hazard” sounded too hazardous. You’ll find that most people still call them Hazards anyway.)
At some point, usually the evening before the start of the event, there will be a marathon course walk. You’ll take your maps, pile onto trucks or ATVs, and be taken around the course. Each level goes together, and there is someone with you (a judge, or technical delegate) who can answer questions. This will help you to not get lost, and to see how well marked the course is so that you are less afraid of getting lost. The course is marked with Compulsory Turning Flags, which may be on your map as CTF or just as ‘gates’. You can be eliminated if you miss a gate, so just make sure to go in numerical order and actually go THROUGH each gate. Since each level goes a different distance, be sure to find out what shape/colour numbers you’re watching for and disregard all the rest.
Aside – At some point during every single marathon I’ve ever been in I’ve been sure that I was lost. I never have been. They generally are really well marked!
While I’m on the course walk, I like to write down each gate, kilometer marker and obstacle in the order that I’ll come to it. I’m not good at reading maps (see aside above) and I’m much more comfortable working my way through a list. Lists are my friend. I also make notes of anywhere that the terrain is rough (ie – “slow down, big drop”) or where I think I might need more clarification (ie – “hard right after 11).
You are given an optimal time to finish the Marathon, and you have a 3 minute window to finish penalty free, not too fast or too slow. You can carry a stop watch to keep track of your time, and I have a chart that tells me what elapsed time I should be at when I reach each kilometer marker, so I know if I need to speed up or slow down. The speed for Training Level VSE’s is 9km an hour, which is an easy jog for most reasonably fit Miniature Horses.
1 km 6:40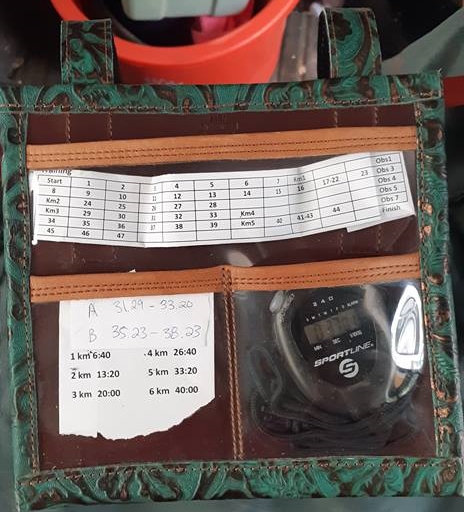

2 km 13:20
3 km 20:00
4 km 26:40
5 km 33:20
6 km 40:00
On the course walk, you won’t be able to stop and walk hazards, but you will be given maps so you can walk them on your own, as many times and as often as you’d like to until the first horse starts on course.
Each Marathon Obstacle is made up of a series of gates that must be navigated in alphabetical order. They are clearly marked, and each one usually includes gates A to E. In Training level, you’ll most likely just have to worry about gates A to C and you can just pretend that D and E (and possibly F) don’t even exist. Gates must be negotiated in the correct order and from the correct direction. Just remember RED ON RIGHT; each gate is marked with a white letter on the left and a red letter on the right. I screwed up the first gate in the first hazard at my first event, and now I say to myself RED ON RIGHT every time I go through a gate and that has saved my butt a few times.
You choose your own path through the hazard. So long as you negotiate the gates in the correct order, it doesn’t matter where you go. In Training level, all that matters is that you go through the gates. You’ll probably be timed, since the timers are there to time the higher levels anyway, but your time doesn’t matter. Once you move up to Preliminary and beyond, you get penalty points for every second you spend in a hazard, so that’s why you see the pictures of horses racing though with navigators hanging off the back of the carriage for balance around corners.
Speaking of navigators: single VSE’s are not required to carry a navigator (though they can), but VSE pairs, tandems and teams need to have a spare person with them.
For marathon, you’ll need to have your spares kit, a helmet, a protective vest, and possibly a slow moving vehicle sign, if any of the marathon takes place on or near a public road (again, this info will be in your prizelist). You’ll also want to have some way to hold your times, maps and green card (which is the timer/score sheet you’ll be given at the start line). I use a number holder (the pocket kind) velcroed to the singletree in front of me, and I see drivers that tape some of the info right to their legs for easy access.
As with Dressage, you’ll be given a start time. You’ll need to report about 10 minutes early for a safety check, and probably will have to hand in a safety checklist that you’ve filled out and signed. At the start gate they’ll give you a 3 minute, 2 minute, 1 minute, 30 second warning, and then count you down from 10 before telling you to go. And also, good luck and have fun! When you reach each hazard, it’s a good idea to call your number out to the timers/judges, and offer a thank you when you leave. There are a huge number of volunteers needed in this sport, it’s nice to let them know that you appreciate their time!
I know the marathon seems overwhelming. So many things to remember! But it’s not as complicated as it sounds, I promise. Also, when I was eliminated at my very first CDE, a very wise friend of mine told me that there were two kinds of CDEers: those who had eliminated and those who hadn’t yet. It doesn’t change the fun or accomplishment of completing a marathon with your driving horse!
Cones
The third phase is Cones, which is sometimes also called Obstacles, just to keep it interesting. In smaller shows, Cones usually takes place immediately after Dressage, but in a full, three day CDE, Cones takes place on the third day.
Twenty pairs of cones are set up, each numbered in the order you are to go through them. Again, you’ll get a map in your package, and you can walk the course as many times as you’d like.
At some point, probably during a safety check, your wheels will have been measured, and prior to your turn to run the cones course, volunteers will reset each and every pair of cones to the correct clearance for your level. Training Single VSE has 35cm of clearance. On top of each cone is a ball, and the goal is to make it through all twenty sets of cones with every ball still in place.
There is a maximum time for cones, and if you pass it you will get some penalty points, but they add up a lot slower than if you knock down a ball, so go for accuracy over speed. In other words, do what I say, not what I do … I can’t resist tearing through a cones course.
Just like in a hazard, remember to keep RED ON RIGHT as you go through the cones.
If you do carry a navigator, while they’re expected to “tell you where to go” during the Marathon, in Dressage and Cones they are only allowed to sit there and look pretty.
One of the best things about Combined Driving is that it appeals to drivers of all levels. From the driver who just wants to get out and have fun with their horse and doesn’t worry about their marathon time, to the competitor who wants to move up the levels and try their skill against others, Combined Driving is fun for everyone! Even when I end up in a division by myself I still get to compete against my previous best dressage score, or try to shave another few seconds off my hazard times.
There are a couple equipment changes to make, in order to cross over from breed show driving to combined driving. You will need to accustom your horse to wearing breeching, as it is required with good reason … far from going around a flat show ring, now there are hills, and brakes are important! While side checks are acceptable at Training Level only, an over check is never allowed. Other than that it’s the things I mentioned earlier – apron, brown gloves, helmet, protective vest, spares kit. If you decide to move beyond Training Level, pneumatic tires are no longer permitted and you’ll have to switch to solid wheels.
More excellent resources for information!
http://www.americandrivingsociety.org
Local Driving Clubs In Western Canada
http://www.albertadriving-acda.ca/
http://www.stonebridgedrivingclub.com/
http://www.highcountrycarriagedriving.org/
http://www.bccarriagedriving.com/
http://www.manitobadrivingsociety.com/
If you don’t feel comfortable jumping in and competing, but would like to learn more about combined driving, consider volunteering at an event. What better way to learn the ropes!
